The MarsBased SEO guidelines
Diario del capitán, fecha estelar d557.y36/AB

As a development consultancy, we get the chance to work on very different products and projects. From all of them, we learn something new, but in all of them, we apply our previous knowledge.
With over 20 different projects in our first two years, we've compiled our SEO 101 that we apply to all our projects.
Before getting into detail, here are the tools that you will need.
URL: https://www.google.com/webmasters/tools/
Description: Google Webmaster Tools is a Google service to list and manage your domains. From domain verification to keyword analysis, this is a very useful tool. Amongst other things, you can verify the schema.org data, the robots.txt file and the sitemap structure.
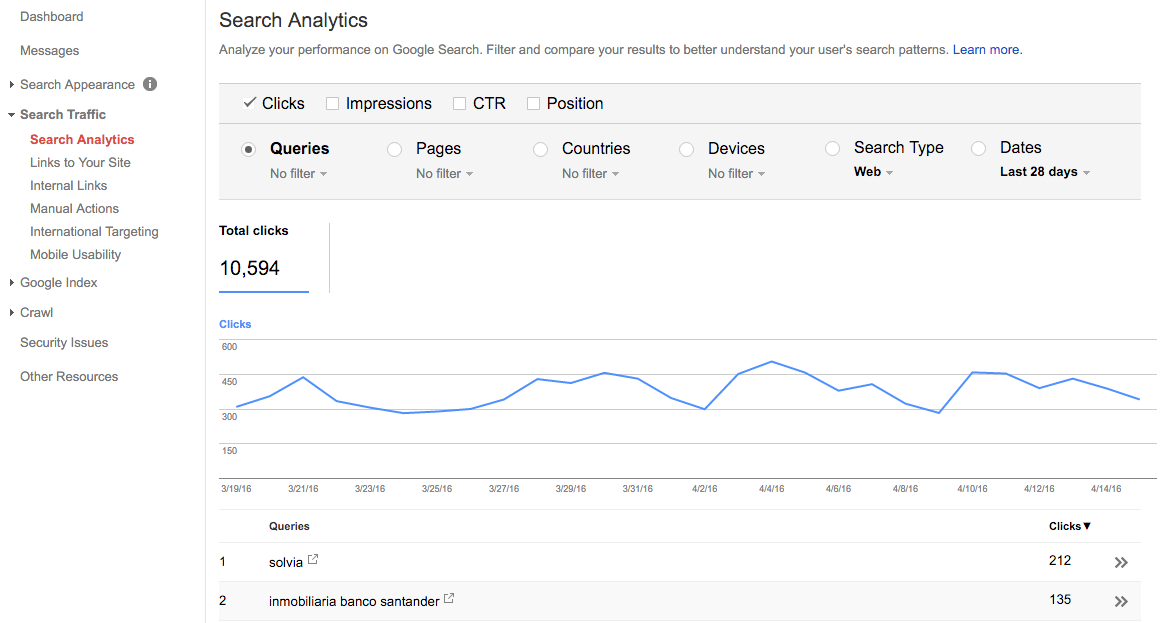
We will use Google Webmaster Tools to add all variants of the same domain, in order to claim and verify them:
We will also check for errors here: 404s, performance errors, robots.txt not found, sitemap errors, etc. This is a most powerful tool and I recommend taking your time to explore it.
If, and only if, the site includes search and has got therefore search parameters in the URL, this needs to be configured. Here’s a good guide to help you to set up the search parameters. Typically, Google will figure it out automatically, and it’ll be right in the 80% of the cases, which is good enough. Don’t waste too much time with this.
URL: http://www.google.com/analytics
Description: Google Analytics is THE tool when it comes to analysing user behaviour on a given site. It tracks every visitor down, from where they come from, what do they do on the site, and where do they go when they leave. Analytics does also allow you to create marketing campaigns, among other capabilities.
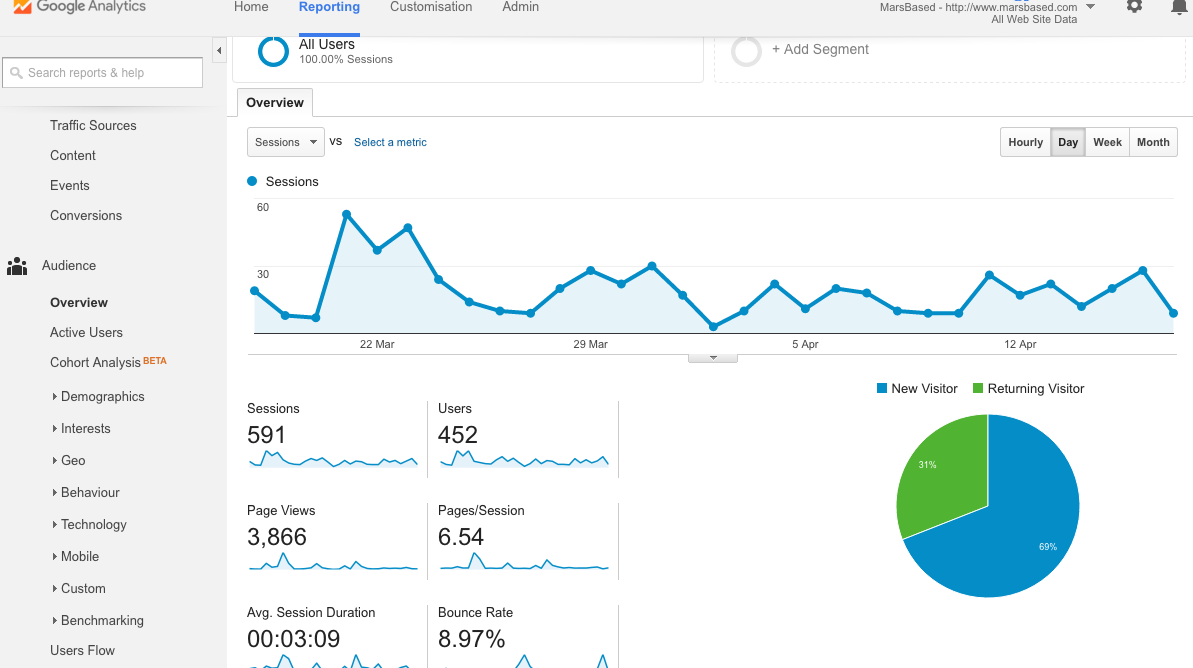
This is like Google Webmaster Tools on steroids. There’s so much you can do here it's not even funny. You can track the user's behaviour, see them in real time, extract demographics of the audience that's visiting you, see from which channels do they come from, etc. However, if Google Webmaster Tools was too complicated for you, don't even try here.
Google Analytics will provide you with the Google Analytics tracking code, which you will find in the Admin tab. This is what you will implement in every project inside the <head> HTML tag as you can see in the example below:

If you're a developer, you probably don't need anything else from Google Analytics. If you're a marketer, you're better off studying and testing it already!
The sitemap is typically an XML file that describes the structure of your site, and it’s placed in the root of the project. Sitemaps follow a convention that you can find in the Wikipedia entry about the Sitemaps files.
Normally, sitemaps can hold up to 50k URLs, but it’s advisable to split them into smaller sitemaps that link each other. Most indexers recognize also zipped sitemaps.
Here’s a sample sitemap we created.
You can test the structure of your sitemap using Google Webmaster Tools:
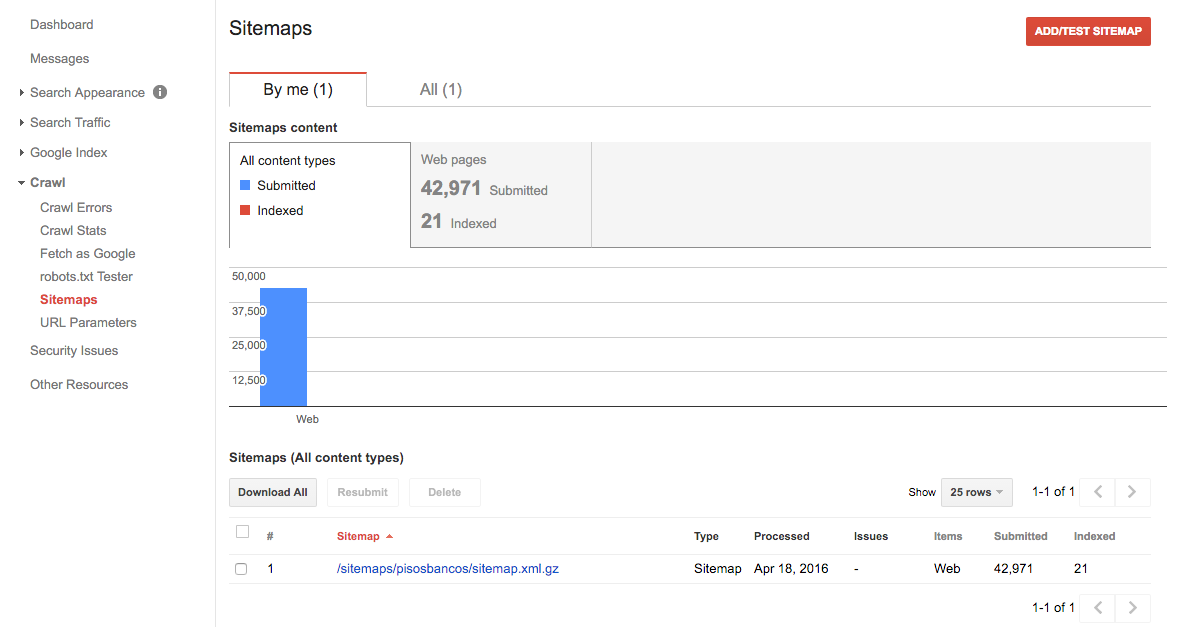
You can even submit it from there. But most indexers will either look at www.site.com/sitemap.xml or else read the sitemap location from the robots.txt file, where you can also specify it. We will see this in the next section!
If you encounter any error, here’s a list of the most common errors when creating sitemaps.
Robots.txt is a file we use to tell all crawlers how to behave when crawling a site. It is located at the root level (www.site.com/robots.txt) and can contain either generic rules (specified by the wildcard character *) or specific rules (only for Googlebot, for instance).
Generically, Robots.txt files have got a standardised structure that you can find in this guide.
Like with the Sitemaps, Google Webmaster Tools has got an online tester for Robots.txt. Here, you can test its syntax and submit it:
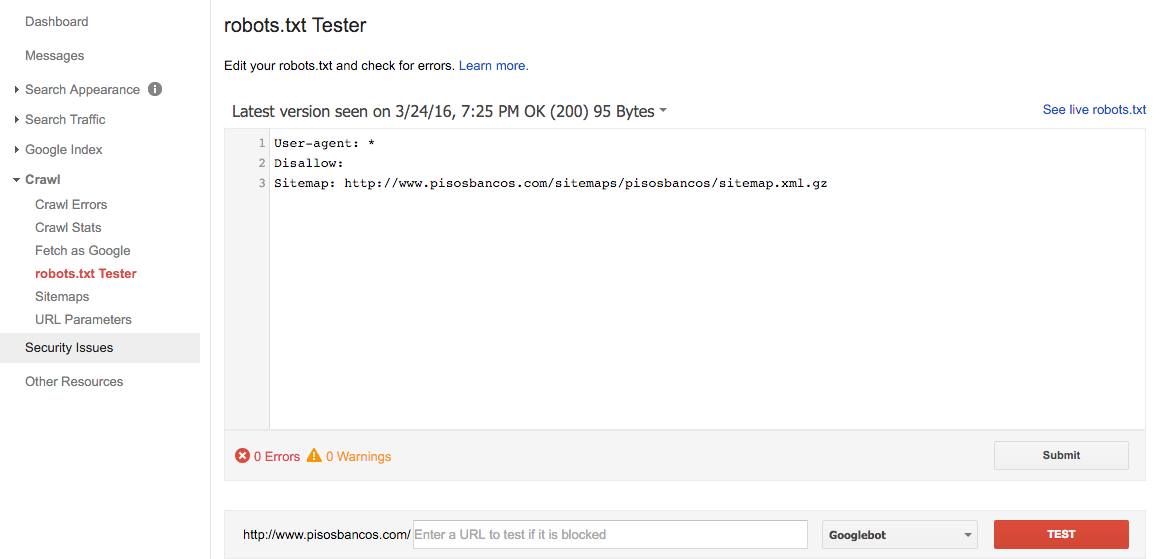
The above Robots.txt reads like this:
For all crawlers, do not disallow any route, and the site’s sitemap is located at: http://www.pisosbancos.com/sitemaps/pisosbancos/sitemap.xml.gz
To learn more about Robots.txt and everything involved, check Google’s detailed guide about this file type.
Our sitemaps, generically, will be like this one:
     User-agent: *
     Sitemap: https://www.marsbased.com/sitemap.xml
These two lines mean that all crawlers are allowed (*) and the address of the sitemap file. We will generally not disallow access to assets unless we see this affects in performance. In the past, access to CSS and JS files was blocked, but not anymore, and Google strongly discourages it.
Once you're past all the previous setup concerning Google Analytics and Google Webmaster Tools and your sitemap and robots files are correctly configured, let's code!
Before getting into actual code, you will need to enforce secure connections to your site.
Since 2015, HTTPS-enforced websites rank better. Therefore, make sure you include HTTPS in your project.
As we specified briefly in the Google Webmaster Tools section, you will need to add the HTTPS variants of your domain.
Finally, we can get our hands on the code!
A lot of things have changed in the last years. Don’t trust what you remember to be true from 2004. Google is constantly experimenting and altering its algorithm, so you need to catch up on the recent happenings.
Since we're writing an SEO 101 here, we will review the basics we implement in each project.
We will implement the following tags in the <head>:
<meta name="author" content="www.marsbased.com">
<meta name="copyright" content="2016 MarsBased">
<meta content="MarsBased is a development consultancy from Barcelona for web & mobile apps based on Ruby on Rails and Angular. Contact us for a free estimate for your app." name="description" />
The description needs to be adapted to the project’s description. Author and Copyright might stay like this unless the client states otherwise.
The metatag keywords is deprecated. So don’t include it.
Each page needs a <title> tag like this:
<title>MarsBased | Ruby on Rails development consultancy</title>
The | character separates entities. Typically the following structures are used:
Brand name | description | page nameDescription | page name | brand namePage name | brand nameThe length of this string should not exceed 55-60 characters, as Google will only display as many:
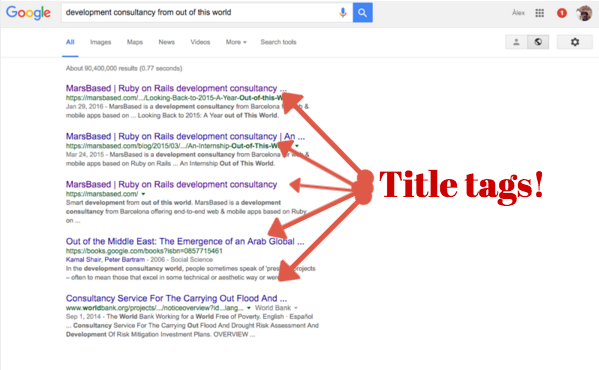
This is the most important tag in the page, so make sure to introduce keywords and the brand name. Simpler is better.
Some considerations for the title:
This one is painful to implement the first time, but once you get it, it’s really quick.
Head out to the Schema.org official website to find out more.
Basically, this adds extra information to the HTML tags and attributes in order to help search engines understand complex data models and their attributes, so they can create rich snippets such as these ones:
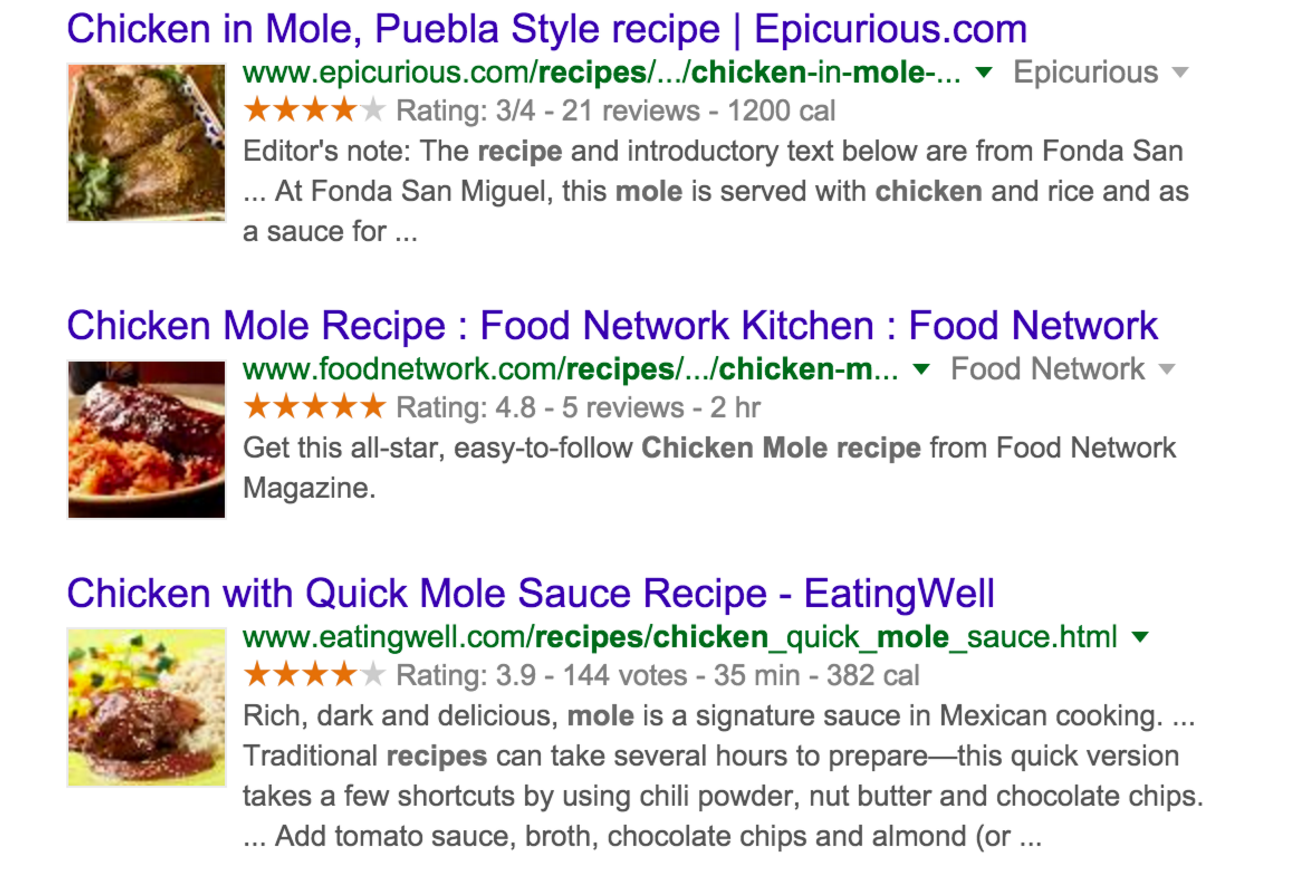
In these pages, the Schema for recipes has been used, highlighting not only the picture, but also the ratings, the number of votes, number of reviews, the cooking time and the calories count.
Pages with schema.org provide more meaningful information to the users, but also to the crawlers, and therefore rank better.
Frontend developers might have some concerns on how this can pollute their code. I actually wrote a piece on how to include schema.org metadata without interfering with your current code.
Some basic rules for content. They’re too many to remember unless you’ve been doing this for years. Use this as a checklist:
<a>) elements should always include the alt and title attributes, as descriptive as possible. Use keywords!target=_blank attribute. We don’t want to lose navigation to other websites.alt attribute. Use keywords!
*No more than one h1 per page.<h1> only includes <h2> (as many as you need). <h2> only includes <h3>, and so forth. Headers should be hierarchical.We should also avoid duplicated content. In our projects, most likely we will only get duplicated content because of a poor configuration of the multi-language. If the client steals content from other sites we can't control it. Anyways, read this article on how to deal with duplicated content using the rel=canonical tag, written by Moz.
For the extra points, use Pagespeed Insights (by Google) to help you to create the best experience.
This is critical: if we’re migrating a project from a URL structure to a different one, we need to massively redirect all old URLs with 301’s to the new ones. Otherwise, we will lose all traffic. I strongly recommend reading these articles:
Another important thing is that the old site might have metatags as validators (to validate domain names, licenses and whatnot). Make sure you migrate these ones as well. These look like this:

If we don't migrate these, some services might stop working!
Because we've got clients from all over the world, we sometimes work with multi-language sites. Here we need to properly tell the crawlers that two pages have the same content albeit in different languages.
We need to tell the crawlers that two pages are the same, but in different languages. This is configured using some tags, and a couple of tweaks in Google Webmaster Tools. Read more about it in this excellent guide for multi-language sites, written by Google.
If you have followed me this far, hats off! This is but a very brief and quick introduction to the basics of SEO we introduce in every project we develop. We cannot cover everything and we try to optimise our time as much as possible.
Let us know your best practices in on our social media channels on our email! Also, as mentioned previously, this is a basic SEO 101 guide, so if you want us to delve into deeper detail in any specific topic, let us know so we can write an entry about it!

Find out how we organise in our frontend projects and the tools we use.
Leer el artículo
Learn how to create landing pages that are secure, fast and SEO-oriented for free with Jekyll & Middleman
Leer el artículo
We share useful Angular resources, questions, experiences, tools, guides and tutorials to keep this curated Angular reference post up-to-date. Enjoy it!
Leer el artículo